Trying to remove a wasp nest without knowing what you’re up against is a massive gamble. Your success, and more importantly your safety, really comes down to understanding the lifecycle of wasps here in the UK. A small, easy-looking nest in spring can turn into a serious hazard by the end of summer. Knowing how to tell the difference between wasps, bees, and hornets is also non-negotiable for a safe and legal approach.
Understanding Wasp Nests and Seasonal Risks
Before you even think about tackling a wasp nest, you need to get your head around their seasonal behaviour. This isn't just about being a nature enthusiast; it's about strategy. It tells you whether you can handle it yourself or if it's time to get a professional on the phone. The nest you spot in May is a completely different beast to the one buzzing in August.
It all starts in spring, usually around April or May, with a single queen. She builds a new nest from scratch, and at this point, it’s often no bigger than a golf ball, containing just her and a handful of her first workers. Honestly, this is the golden opportunity to intervene, as the colony is tiny and not nearly as aggressive. The trouble is, these early nests are usually tucked away and go completely unnoticed.
The Summer Explosion
Once summer gets going, the nest's growth goes into overdrive. By July, the population has exploded, and the nest is suddenly much more active and obvious. This is where the risk level shoots up.
The peak season for wasp activity in the UK is typically August and September. During this time, a single, mature nest can house an average of 2,000 to 6,000 wasps. We’ve seen some huge nests containing up to 20,000 individuals, turning what was a minor issue into a major threat. For more on this, Oxford City Council's pest control advice offers some solid details on wasp lifecycles.
As the season starts to wind down, food sources get scarce, and the wasps' behaviour changes dramatically. They stop hunting insects to feed the larvae and start craving sugar. This is why they become such a pain at picnics and beer gardens. But more importantly, their whole attitude changes.
With the colony's life cycle nearing its end, the workers' only job left is to defend the nest and their queen. This makes them far more aggressive and unpredictable. They're much more likely to sting with very little provocation.
Identifying Your Unwanted Guests
Your first job is to correctly identify the insect you're dealing with. This guide is all about common wasps (Vespula vulgaris), but it’s surprisingly easy to mistake them for other stinging pests. Getting it wrong can lead to using a treatment that doesn't work, or worse, getting into legal trouble if you disturb bees, which are protected pollinators. A crucial first step is to learn about the differences between wasps and bees.
Here’s a quick rundown:
- Wasps: Have that classic yellow and black striped body, a very narrow "waist," and are smooth and almost hairless.
- Hornets: Are bigger than wasps, with more of a brown and yellow-orange pattern instead of black. They’re less common but look much more intimidating.
- Bees: Are generally rounder and look fuzzy or furry compared to wasps. Their stripes are less defined, and because they are protected, their nests need a specialist, non-destructive approach.
Nailing the identification ensures you use the right tactic for the right pest, keeping you safe and on the right side of the law.
Is DIY Wasp Removal A Safe Option For You?

Thinking about tackling a wasp nest yourself? It's a decision that needs some serious thought and goes way beyond just grabbing a can of insecticide off the shelf. Honestly, not every nest is a job for a DIYer. You need to do a genuine, real-world risk assessment before you even think about it, because getting this wrong can be painful and dangerous.
The whole decision really boils down to three things: the nest's size, its location, and how easily you can get to it. These are the factors that separate a manageable little problem from a full-blown hazard that’s best left to the professionals.
Assessing the Nest's Size and Location
The size of the nest is your first big clue. A nest the size of a golf ball early in the season is a world away from one that’s grown to the size of a rugby ball by August. Smaller nests mean fewer wasps and, generally, a less aggressive colony. It's a much more predictable situation.
But size isn't everything. Location is just as critical. A small, exposed nest hanging from a low branch at the end of your garden is one thing. The exact same size nest tucked away inside your wall cavity, under the roof tiles, or two storeys up on a gable end? That’s a completely different and far more dangerous beast.
Let’s look at a couple of real-world scenarios to help you gauge the risk:
- Low-Risk Scenario: You've found a small nest, no bigger than your fist, hanging from a shed roof. It's well away from your back door, you can see the entrance clearly, and you don't need a ladder to reach it. This is potentially manageable.
- High-Risk Scenario: You’ve noticed wasps disappearing into a tiny gap in the brickwork, high up on the second floor. You can’t see the nest itself, which means it’s inside the wall, and you'd need a very tall, wobbly ladder to get anywhere near it. This is absolutely not a DIY job.
Any nest that has found its way into the structure of your home—think wall cavities, lofts, or under the floorboards—should be left to the pros. If you try to treat these yourself, you risk driving hundreds of angry wasps further into your house, creating a far worse nightmare.
Evaluating Personal and Household Safety
This is the final, and most important, check. We're talking about personal safety, and specifically, allergies. A wasp sting is painful for most of us, but for someone with an allergy, it can trigger anaphylaxis—a severe, life-threatening reaction.
Before you even consider moving forward, you must be 100% certain that nobody in your household has a known allergy to wasp or bee stings. Don't forget to consider close neighbours who might be in the garden, too.
Even if there are no allergies, multiple stings can be incredibly dangerous for anyone, especially children, the elderly, or pets. An agitated colony can swarm and attack anything it sees as a threat, leading to dozens, or even hundreds, of stings.
Ultimately, this is about making a calculated, informed decision—not a reckless one. If you have the slightest doubt about the nest's location, its size, or the potential risk to people, your safest and smartest move is to call a professional. Wasp nest removal is no time for guesswork.
A Practical Guide to DIY Wasp Nest Treatment
So, you've decided a DIY approach is on the cards. Good. Taking action is the right move, but success here isn't about brute force. It's about a calm, methodical process that puts your safety front and centre. This is my professional guide to walking you through it, from getting your kit together to making sure the job is actually done.
First things first, and this is the most important rule I can give you: timing is everything. You absolutely must tackle this at dusk or, if you're an early riser, at dawn. Why? Because the wasps are far less active in the cooler air, their metabolism slows right down, and most importantly, the whole colony will be tucked up inside the nest for the night. This is your prime window of opportunity.
Assembling Your Safety Gear and Treatment
Before you go anywhere near that nest, you need the right gear. I can't stress this enough—it's completely non-negotiable. Trying to take on a nest without full protection is just asking for a world of pain and a very dangerous situation. Think of your gear as the essential barrier between you and a very angry, very determined swarm.
This image shows you exactly what you need. Don't skip a single item.
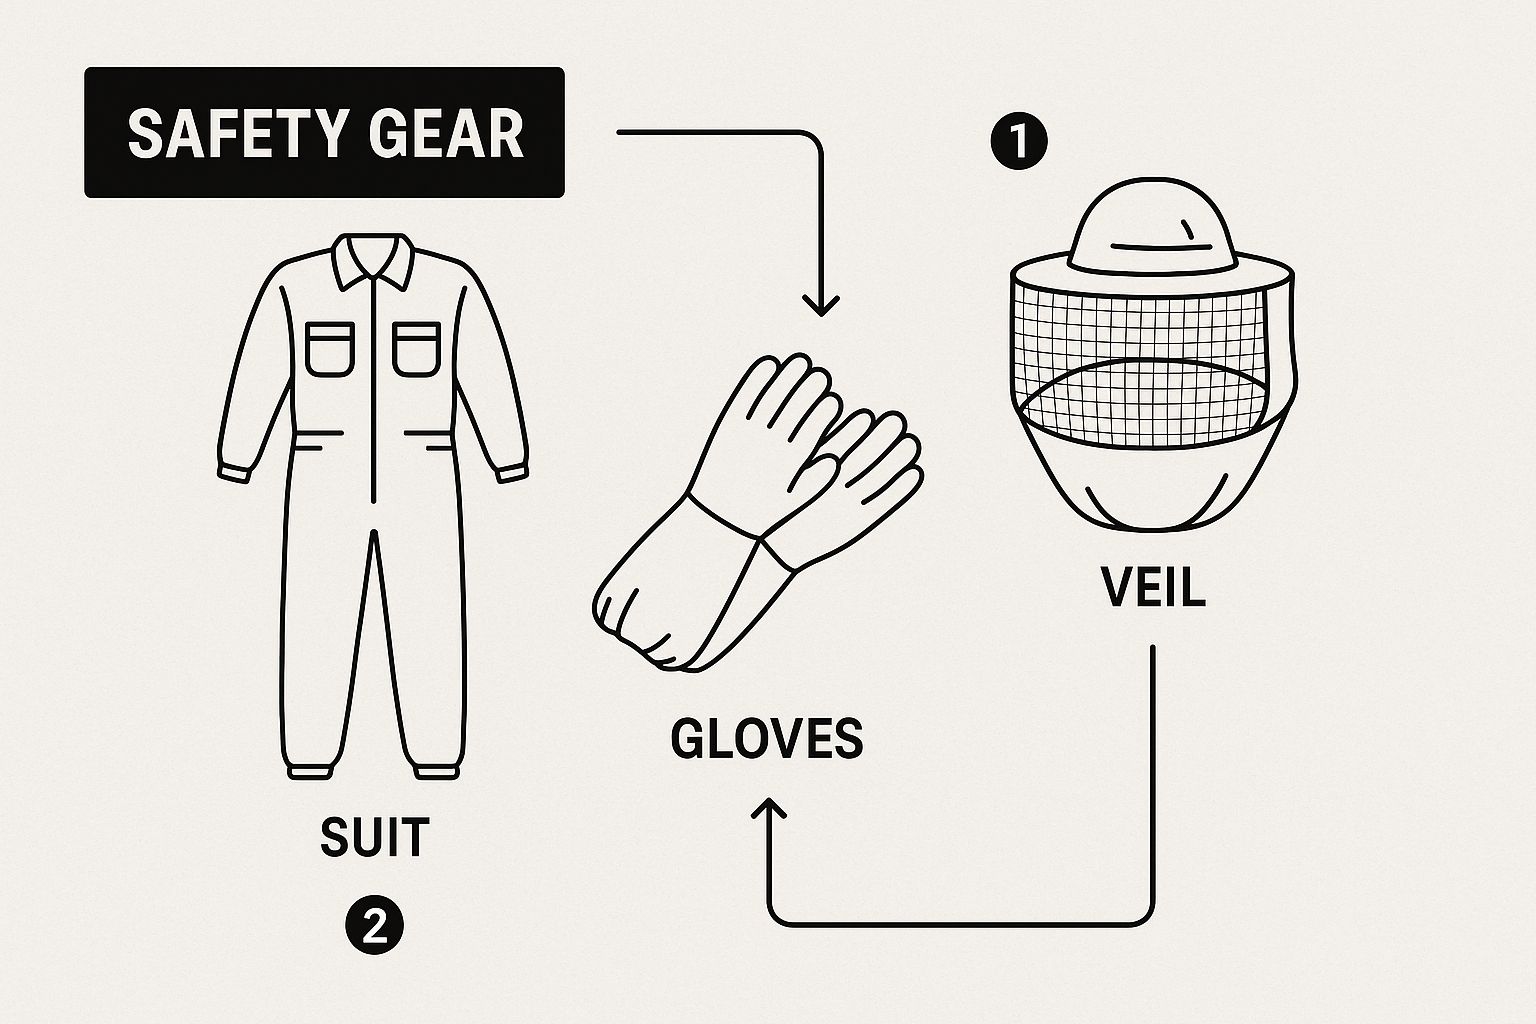
As the image shows, your personal safety kit is the foundation of any DIY attempt. Once you're properly kitted out, it's time to choose your weapon.
For DIY jobs, you're looking at two main options: a wasp nest destroyer foam or an insecticidal powder.
- Foam Sprays: These are fantastic for nests you can see hanging freely. The foam expands rapidly to completely block the entrance, trapping the wasps inside as the insecticide gets to work.
- Powder (or Dust): This is my go-to recommendation for nests where you can only see the entry point, like a small hole in the brickwork or a gap under a roof tile. As the wasps come and go, they'll carry the fine powder deep into the nest on their bodies, doing the hard work of spreading the treatment for you.
To help you decide, here’s a quick breakdown of what you'll need.
Essential Toolkit for DIY Wasp Nest Treatment
This checklist covers the must-have protective gear and treatment products for a safe and effective DIY process.
| Item Category | Specific Item | Key Feature/Purpose |
|---|---|---|
| Protective Gear | Full-body Wasp Suit with Veil | Provides a complete barrier against stings, protecting your face, neck, and body. |
| Protective Gear | Thick, Sting-proof Gloves | Protects your hands, as wasps will often target them first. |
| Protective Gear | Sturdy, Closed-toe Footwear | Prevents wasps from crawling up trousers or stinging your feet. |
| Treatment | Wasp Nest Destroyer Foam | Ideal for visible, hanging nests; expands to block the entrance and trap wasps inside. |
| Treatment | Insecticidal Powder (Dust) | Best for hidden nests with a small entry point; wasps carry it into the colony. |
| Safety | Torch with a Red Filter | Allows you to see in the dark without alerting or agitating the wasps. |
| Safety | Clear Escape Route | A planned, unobstructed path to get away quickly after applying the treatment. |
Having the right tools isn't just about effectiveness; it's about making sure you can do the job without putting yourself at risk.
The Treatment Application
Right, you’re fully kitted out in your protective gear, you’ve picked your product, and you’ve planned your escape route. It’s time to go.
Approach the nest calmly and quietly. Your goal is to avoid any vibrations or sudden moves that could put the wasps on high alert.
Get into a position where you can aim the treatment directly into the nest’s main entrance. If you're using a foam spray, give it a good, long blast to completely saturate the opening. For powders, use the puffer bottle to shoot several sharp puffs straight into the hole.
Now for the most critical part of this entire step: leave immediately. Seriously. Do not hang around to see what happens. The insecticide needs time to work, and the longer you're there, the bigger the risk. Retreat to a safe distance and get back inside.
Post-Treatment Observation and Confirmation
Now comes the hard part: being patient. It will take at least 24 to 48 hours for the insecticide to work its way through the colony and do its job. It's normal to see a few disoriented, sluggish wasps near the entrance during this time, so don't panic.
After 48 hours have passed, have a look at the nest—from a safe distance. If you see zero activity, no wasps flying in or out, then congratulations, the treatment was a success. If you still see signs of life, a second application might be needed, but only if you feel it's completely safe to do so.
Honestly, if the first attempt doesn't work, it's often a sign that the nest is more complex than you thought. At that point, calling in a professional for wasp and bee treatment is the smartest and safest call you can make.
Knowing When to Call a Professional Exterminator
While tackling a small, easy-to-reach wasp nest might feel like a manageable DIY job, knowing when to step back is the smartest and safest thing you can do. There are some very clear red flags that signal it’s time to put down the insecticide and call in a certified professional. Honestly, getting this call wrong can lead to a dangerous situation that spirals out of control fast.
Your first major sign to stop is any nest located within the structure of your home. If you see a steady stream of wasps vanishing into a small gap in your brickwork, an air vent, or under the roof tiles, the nest is almost certainly inside a wall cavity or your loft. Trying to treat this yourself is a recipe for disaster. You risk driving hundreds of angry wasps into your living spaces, not out of them.
High-Risk Scenarios Demanding an Expert
The nest's size and height are other non-negotiable factors. As a general rule of thumb, any nest larger than a rugby ball is home to a massive, highly aggressive colony that's just too risky for an amateur to handle. The sheer number of wasps that will pour out to defend it is staggering.
Likewise, any nest that forces you onto a ladder—especially a tall one—should be left to the pros. Picture this: you're balancing precariously, trying to aim a spray can, when a swarm of furious wasps suddenly attacks. It's an incredibly dangerous scenario. Professional exterminators have the proper access equipment and safety protocols to manage these high-risk jobs without a second thought.
The moment you feel any hesitation or uncertainty, that’s your cue to call for help. Your gut feeling is often your best safety guide in these situations. It’s simply not worth risking your health or your family's safety.
Understanding the Cost of Professional Wasp Nest Removal
A lot of people hesitate to call a professional because they're worried about the cost, but it's often a smaller investment than you might imagine for guaranteed safety. In the UK, the price for professional wasp nest removal can vary quite a bit, depending on things like your location and how tricky the job is.
Generally speaking, you can expect the cost to fall somewhere between £71 and £241 per project. It's worth noting that prices in major cities like London can be up to 40-50% higher than in smaller towns. You can see more detailed pricing insights on what impacts wasp removal costs on Airtasker.com. This fee covers the expert’s time, their specialist gear, and the assurance that the nest will be dealt with effectively and safely.
When you weigh that against the potential for multiple painful stings or property damage from a botched DIY attempt, it really is a small price to pay for peace of mind. A reputable company will always give you a clear quote upfront. If you're facing a tricky nest, exploring professional pest control services is the responsible choice.
Right, you've dealt with this year's wasp nest. The last thing you want is to go through all that hassle again next summer. Once the immediate threat is gone, your focus should shift to long-term prevention. It’s all about making your property as unappealing as possible to a queen wasp searching for a new home next spring.
A bit of proactive work now is your best defence. Thankfully, the most effective strategies are simple jobs you can get done over a weekend. It all starts with a good, thorough look at the outside of your home, hunting for any potential weak spots.

Sealing Up Potential Entry Points
Queen wasps are incredibly opportunistic. Come spring, they’re on the lookout for small, sheltered spots to build their new colonies. Your mission is to get rid of these tempting building sites before they're discovered.
Take a slow walk around your property. Keep an eye out for:
- Cracks in mortar or brickwork: Even a tiny gap is a wide-open door for a queen to slip inside a wall cavity.
- Damaged fascia or soffit boards: These gaps give wasps a direct route into your roof space—a prime piece of real estate for a nest.
- Unsealed utility pipes: Check where pipes, wires, or cables enter your house and fill any gaps around them with a good quality sealant.
For small cracks, a simple exterior caulk is perfect. If you find larger holes, you’ll need to use expanding foam or even a bit of fresh mortar to do the job properly. Think of it as putting up a "no vacancy" sign for next year's queens.
An old nest is never reused, but the conditions that made the spot attractive in the first place still exist. Failing to seal the entry point is like leaving your front door wide open for the next queen looking for a home.
Cut Down on Garden and Outdoor Attractants
It’s not just the structure of your house that can draw wasps in. Your garden and outdoor areas play a huge role. From open rubbish bins to certain types of plants, reducing these temptations is a crucial part of keeping wasps away. You can find out more about how environmental factors influence wasp activity on dealey.co.uk.
A great, simple step is to install fine mesh screens over any loft vents or air bricks. This keeps vital airflow going but creates a solid physical barrier. Also, make sure your compost bin is well-managed and covered, and always keep the lids on your outdoor rubbish bins securely fastened.
What about those fake wasp nests you see for sale? The jury is still out on how effective they are. The theory is that wasps are territorial creatures and will steer clear of building a new nest if they think another colony has already moved in. It’s a cheap, easy measure that might just be enough to convince a scouting queen to look elsewhere.
Got Questions About Wasp Nest Removal? We’ve Got Answers.
Even with a solid plan, it's natural to have a few lingering questions. When you’re dealing with something as risky as a wasp nest, knowing the specifics helps you decide whether it’s a job you can handle or one that’s best left to the experts.
We get these questions all the time from homeowners. Here are the straightforward answers you need to make the safest call for your situation.
What Happens If I Just Leave a Wasp Nest Alone?
It’s a tempting thought, isn’t it? Especially if the nest seems tucked away. If a nest genuinely is far from any human activity—think the very bottom of a large garden—then leaving it be might be an option. The colony will die off naturally in the winter, and that specific papery home will never be used again.
However, this is a risky strategy for any nest near your house, patio, shed, or walkways. That colony will grow all summer long, and by August, it could be home to thousands of wasps. This massively increases the sting risk for you, your family, and any curious pets.
A large nest can also cause physical damage. We’ve seen them rot timber in lofts and compromise plasterboard in wall cavities. For any nest close to your living areas, getting it dealt with is almost always the safest move to protect both people and property.
Can I Just Knock It Down with a Stick or Hose It?
Please, don't. This is one of the most dangerous things you could possibly do. Hitting a nest with a broom or blasting it with a pressure hose will trigger an instant, massive, and incredibly aggressive response from the entire colony.
You won’t be fending off one or two angry wasps; you’ll be facing a full-on swarm. Wasps can sting repeatedly, and you could get dozens, even hundreds, of stings in seconds. That level of venom can be life-threatening, even if you don't have a known allergy.
Always remember: wasps are fiercely defensive. A sudden physical attack is a direct threat to their queen and young, and they will attack relentlessly to neutralise that threat—which, in this case, would be you.
If you’re attempting a DIY removal, only use a purpose-made insecticide spray designed for wasps, and apply it from a safe distance. Follow every instruction on the can. Better yet, if you're not 100% confident, just call a professional. It’s not worth the risk.
The Wasps Are Gone but the Nest Is Still There. Should I Remove It?
Once you've treated a nest, it’s vital to wait at least 48 hours to be sure all activity has stopped. You might see a few stragglers returning during this time, but they’ll soon come into contact with the residual insecticide and die off.
So, what about the empty nest? Since wasps never reuse an old nest, getting rid of it is mostly for cosmetic reasons or to stop other pests, like spiders or woodlice, from moving in.
If the old nest is easy to reach, you can pop on some gloves, knock it into a sturdy bag, and throw it in your general waste bin. Simple. But if it's in a difficult spot—deep inside a wall cavity or high up in the eaves—it's often best to just leave it. The nest is only made of chewed wood pulp (think paper-mâché), and it will eventually dry out, crumble, and break down on its own without causing any harm.
If you're looking at a wasp problem that feels too big or too risky to handle yourself, don't hesitate. For guaranteed safe, effective, and professional wasp nest removal, contact the team at Pest Predators Limited today and let our experts restore your peace of mind. Find out more at https://www.pestpredatorslimited.co.uk.